











Restaurant Food Waste Log - How to Track and Reduce Kitchen Waste
A food waste tracking sheet helps restaurants record what's discarded and why, analyze patterns, and take practical steps to cut kitchen waste and costs.


Why Restaurants Need a Food Waste Tracking System
Food waste is one of the most overlooked expenses in restaurant operations. Every time ingredients spoil, prepared food goes unused, or employees discard items because of preparation mistakes, restaurants lose money. These losses can accumulate over time, increasing food costs and reducing profit margins. Without a consistent way to record discarded ingredients, restaurant owners may struggle to understand where waste occurs and how much it costs their business. A restaurant food waste tracking system helps operators monitor these losses by recording what gets discarded, how much is wasted, and why it happens. A food waste sheet provides a straightforward way to collect this information and organize it into useful records. Instead of relying on estimates or employee observations, managers can use actual waste data to identify recurring problems in kitchen operations. Common sources of restaurant food waste include - 1. Ingredient spoilage - Perishable products expire or become unusable because of improper storage or excess purchasing. 2. Overproduction - Kitchen staff prepare more food than customers order, leaving unused portions at the end of service. 3. Preparation mistakes - Incorrect measurements, improper cutting techniques, and cooking errors result in discarded ingredients. 4. Excessive portion sizes - Inconsistent portioning increases ingredient consumption and leaves more uneaten food. 5. Inventory management issues - Poor stock rotation and inaccurate inventory records allow ingredients to go unused. Tracking these issues gives restaurant owners better visibility into their food waste patterns. By reviewing recorded quantities and associated costs, managers can adjust purchasing decisions, improve food preparation procedures, and establish more effective inventory controls. A food waste sheet is not just a record of discarded ingredients. It is a practical cost-control tool that helps restaurants identify unnecessary losses, improve kitchen efficiency, and make better operational decisions.
What Is a Food Waste Tracking Sheet?
A food waste tracking sheet is a structured record of every item your kitchen discards, along with the details that explain why it was discarded. Each entry typically captures what was thrown away, how much, when it happened, and what caused it. Over time, those entries add up to a clear picture of where your food budget is leaking. The purpose of the sheet is not to assign blame. It is to replace assumptions with facts. When your team logs waste consistently, you can see which items are discarded most often, which stations or shifts produce the most waste, and which causes, such as spoilage or overproduction, show up again and again. That visibility is what makes targeted reductions possible. Choosing a Format - Paper, Spreadsheet, or App There are three common ways to keep a waste sheet, and each suits a different kind of operation. 1. Paper logs. A printed sheet on a clipboard near the prep station or waste bins is the simplest option. It requires no devices, no logins, and no training beyond showing staff where to write. Paper works well for small kitchens or for teams just starting out. The downside is that someone must later transfer the numbers into a format that can be totaled and analyzed, and handwriting can make entries hard to read. 2. Spreadsheets. A spreadsheet built in Excel or Google Sheets offers more flexibility. You can add formulas that calculate costs automatically, filter entries by date or category, and generate weekly or monthly totals with a few clicks. A shared spreadsheet can also be opened on a tablet or phone in the kitchen, so entries go directly into the file with no transcribing. This is a strong middle ground for most independent restaurants. 3. App-based tracking. Dedicated food waste apps and software, some of which connect to scales or cameras, automate much of the process. They can offer built-in reporting and dashboards, and may integrate with your inventory or point-of-sale systems. The tradeoff is cost and the learning curve for staff. Apps tend to make the most sense for larger operations or multi-location groups that need consistent reporting across sites. Whichever format you choose, the best one is the one your team will actually use every shift. A simple paper sheet that is filled out reliably will outperform a sophisticated system that gets ignored. A waste sheet is most valuable when it works alongside the other tools you already use to manage food costs. It complements your inventory counts by explaining part of the gap between what you purchased and what you sold. It supports your purchasing decisions by showing which items you consistently over-order. It informs your prep lists and par levels by revealing where you are producing more than guests actually order. And it feeds into your recipe costing and menu planning, since high-waste items may deserve a second look.

Understanding the Types of Kitchen Waste
Before you can track waste effectively, you need to know what kinds of waste your kitchen produces. Not all waste has the same cause, and the right fix for one type can be useless for another. Sorting waste into clear categories is the foundation of any reduction effort, because it shows you where to focus first. Kitchen waste generally falls into two broad groups - pre-consumer waste and post-consumer waste. Pre-Consumer Waste Pre-consumer waste is any food discarded before it reaches a guest's table. This is the category most within your control, and it usually accounts for the bulk of what a waste sheet will capture. It includes several common types - 1. Trim and preparation waste. Peels, stems, bones, fat, and other portions removed during prep are a natural part of cooking, but the amount varies widely depending on knife skills, cutting methods, and the quality of the product you buy. Excessive trim often points to a training issue or a supplier problem. 2. Spoilage and expiration. Food that goes bad before it can be used is one of the most costly forms of waste, since you have paid for the full ingredient and received nothing in return. Spoilage often signals over-ordering, poor storage conditions, or weak stock rotation. 3. Overproduction. Prepping or cooking more than you can sell leads to leftover food that is discarded at the end of service or the end of its safe holding time. Batch sauces, soups, rice, and prepped garnishes are frequent culprits. 4. Preparation and cooking errors. Burned dishes, incorrectly cooked proteins, wrong orders, and dropped items all fall into this group. They are usually unavoidable in small numbers, but a pattern of repeated errors can reveal problems with training, equipment, or station workflow. 5. Contamination and safety discards. Food thrown out because it was held at the wrong temperature or was exposed to cross-contamination is a necessary loss, but tracking it can highlight gaps in procedures worth correcting. Post-Consumer Waste Post-consumer waste is food that reaches the guest but is not eaten. This includes uneaten portions left on plates, unused bread baskets, garnishes, and items returned to the kitchen. While you cannot control every guest's appetite, patterns here still carry useful information. If diners consistently leave behind half of a particular side dish, the portion may be too large. If a certain entree is regularly sent back, the recipe or presentation may need attention. Post-consumer waste is harder to measure than pre-consumer waste, since it is often scraped from plates in the dish area rather than discarded at a prep station. Some kitchens track it through periodic sampling, such as weighing plate waste for a few days each month, rather than logging every plate. Why Categorizing Waste Matters It might seem easier to record every discarded item under a single heading, but that approach hides the information you need most. Knowing that you wasted fifty pounds of food in a week tells you very little. Knowing that thirty of those pounds came from overproduction, fifteen from spoilage, and five from prep errors tells you exactly where to begin. Each category points to a different solution. Overproduction calls for adjusted prep lists and batch sizes. Spoilage calls for better ordering and storage. Trim waste calls for training and product specifications. Plate waste calls for portion review.
Essential Columns and Fields for Your Waste Sheet
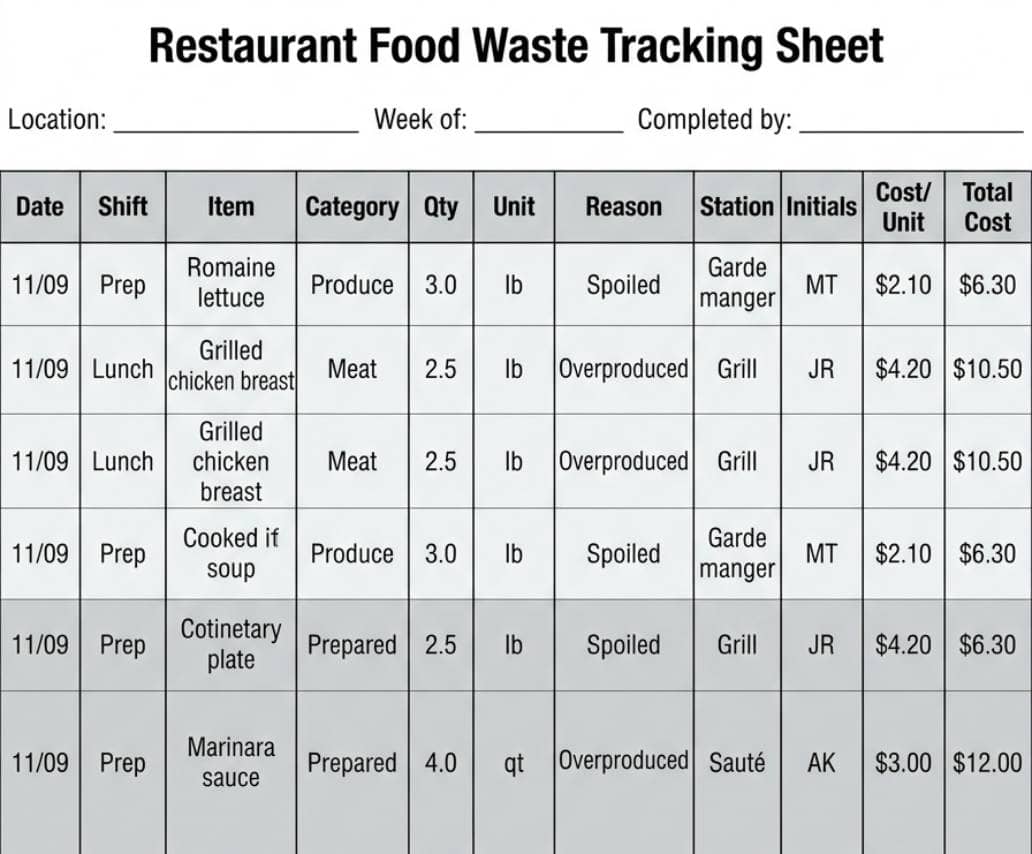
The usefulness of a waste sheet depends on the information it captures. Too few fields and you cannot analyze patterns. Too many and your staff will skip entries or rush through them. The goal is to collect enough detail to answer the questions that matter - what was wasted, how much, why, and what it cost. The fields below form a practical core that works for most kitchens. Date, Time, and Shift Recording when waste occurs lets you spot timing patterns. You might find that most spoilage is discarded during the closing shift, or that overproduction spikes on slow weekdays. Include the date, and either the exact time or a shift label such as morning prep, lunch, dinner, or close. A shift label is usually faster to fill in and detailed enough for most analysis. Item Name and Category Write down the specific item discarded, such as grilled chicken breast or romaine lettuce, rather than a vague label like protein or produce. Specific names make it possible to find your most frequently wasted items. Alongside the item name, include a category column, such as produce, dairy, meat, seafood, dry goods, bakery, or prepared foods. Categories make it easier to total waste by food type and to compare it against your purchasing by category. For consistency, consider providing a pre-set list of item names or a drop-down menu in a spreadsheet. This prevents the same ingredient from being logged under three different spellings, which would scatter your data. Quantity and Unit of Measure Quantity is the heart of the sheet. Weight is the most reliable measure, since pounds, ounces, or kilograms allow you to compare different items and calculate cost accurately. Where weighing is impractical, you can use portion counts, such as number of plates, or volume measures like quarts for sauces and soups. Whatever you choose, include a unit column so entries are never ambiguous, and try to keep the same unit for the same item every time. Reason for Waste This field turns a simple discard log into a diagnostic tool. Provide a short list of reason codes that staff can select or circle quickly. Common options include - - Spoiled or expired - Overproduced - Prep trim or yield loss - Cooking error or burned - Dropped or spilled - Returned by guest or plate waste - Temperature or safety discard - Incorrect order Keep the list short, ideally six to ten options, and include an "other" choice with a space for a brief note. A manageable list speeds up entries and makes the data easier to group later. Cost Per Unit and Total Cost Attaching a dollar value to waste is what makes the numbers persuasive. A column for cost per unit, taken from your recipe costing or latest invoices, allows the sheet to calculate the total cost of each entry by multiplying it by the quantity. In a spreadsheet, this can be automated with a simple formula. On a paper sheet, you can either fill in costs at the time of review or keep a reference list of unit costs near the log. Seeing that a week of small discards added up to a specific dollar amount often motivates a team more than any instruction to "waste less." Station and Staff Initials Recording where the waste occurred, such as grill, saute, garde manger, pastry, or dish pit, helps identify problem areas in your workflow. Staff initials add accountability and make it easy to follow up if an entry is unclear. The aim is not to single out individuals but to ensure that entries can be verified and that every team member understands the log is part of their daily responsibilities. Optional Fields Worth Considering Depending on your needs, you may add a few extras - - Notes or comments for unusual circumstances, such as an equipment failure or a large cancelled event - Preventable or unavoidable to separate waste you can reduce from losses such as bones or peels - Menu item or recipe to connect waste back to specific dishes Add these only if your team can maintain them consistently. A simple sheet that gets completed every day is always better than a detailed one that gets abandoned.
How to Create Your Food Waste Sheet
Once you know which fields your sheet needs, building it is straightforward. The steps below apply to a paper log or a spreadsheet, and most kitchens can have a working version ready in a single afternoon. Step 1. Pick the Format Your Team Will Actually Use Decide how entries will be recorded, based on your kitchen's size, your staff's comfort with technology, and how much time managers have to review the data. A small kitchen with a lean team often does best with a printed sheet on a clipboard. A busier operation where a manager reviews numbers weekly may prefer a shared spreadsheet on a tablet. If you are unsure, start simple. You can move to a more advanced format once logging has become routine. Step 2. Build Your Category and Reason Lists Create the short lists staff will choose from. Set your food categories to match how you buy and store ingredients, such as produce, dairy, meat, seafood, dry goods, and prepared items. Then define your reason codes, such as spoiled, overproduced, trim loss, cooking error, dropped, and plate waste. Use plain language and keep each list short. On a paper sheet, print the reason codes directly on the page so no one has to memorize them. In a spreadsheet, turn both lists into drop-down menus so spelling and wording stay consistent. Step 3. Arrange the Columns Order the columns the way a cook naturally thinks through an entry - date and shift, then item, category, quantity, unit, reason, station, and initials. Place the cost columns on the far right, since staff should not have to fill them in during service. On paper, leave generous space in each column for handwriting. In a spreadsheet, freeze the header row so the labels stay visible as entries pile up. Step 4. Automate the Math In a spreadsheet, add a formula that multiplies quantity by cost per unit to give the total cost of each entry. A practical setup is a separate tab that lists every item with its current unit cost and unit of measure. The main log then pulls the right cost automatically once an item is chosen, using a lookup formula such as VLOOKUP or XLOOKUP. Add a summary tab that totals waste by day, week, category, and reason. On a paper log, assign someone to calculate costs during review, using a reference list of unit costs kept in the office. Step 5. Put the Tools Where Waste Happens Even a well-designed sheet fails if it is inconvenient. Staff will log waste only if the sheet and scale are within arm's reach when something is discarded. Place a scale and clipboard near the main prep area or next to a dedicated waste container, so food is weighed and recorded before it reaches the general trash. For busy stations like the line, a smaller sheet or a wall-mounted tablet allows quick entries without slowing service. If weighing everything is unrealistic, set simple rules. For example, weigh prep waste and spoilage, and count plate returns by portion. Step 6. Run a Short Trial Before a full rollout, test the sheet for a week with one shift or one station. Ask the testers which fields were confusing, which slowed them down, and which reason codes did not match what they saw. Then revise - remove a column, reword a code, or add a category. A trial prevents frustration later and gives your team a voice in the process, which builds buy-in. Step 7. Launch and Explain the Purpose When the sheet is ready, introduce it to the whole team. Explain why you are tracking waste, how the data will be used, and what you expect from each person. Stress that the goal is to improve kitchen processes, not to criticize individuals. Show where the sheets and scales are, walk through a sample entry, and name who to ask with questions. A short pre-shift meeting is usually enough. Restaurant Food Waste Tracking Sheet The template below puts the steps together. The entries are sample data to show how a completed sheet looks.
Best Practices for Using the Sheet Daily
Creating a well-designed sheet is only the first step. The real value comes from using it consistently, shift after shift, until logging waste becomes a normal part of how your kitchen operates. The practices below help turn a new tracking sheet into a lasting habit. Assign Clear Responsibility A waste sheet that belongs to everyone often belongs to no one. Designate a point person for each shift, such as the sous chef, a lead cook, or the closing supervisor, who is responsible for making sure entries are recorded and the sheet is complete by the end of service. This does not mean one person logs everything. Every cook should record what they discard at their own station. The shift lead simply ensures nothing is skipped and answers questions as they come up. At the management level, name one person who owns the overall process. This person reviews the logs, keeps supplies stocked, and follows up when entries are missing or unclear. Train Staff to Record Accurately and Consistently Accurate data depends on every team member measuring and recording in the same way. During onboarding, and again during the first few weeks of rollout, show staff exactly how to complete an entry. Cover how to zero the scale with an empty container, which unit to use for each item, how to pick the right reason code, and what to do when an item does not fit any category. Consistency matters as much as precision. If one cook records a spoiled tray of chicken by weight and another records it by number of portions, the totals will not match up. Post a quick reference guide near the sheet, listing standard units for common items and brief definitions of each reason code, so staff can check without interrupting a busy colleague. Keep Entries Fast and Simple Staff will skip the log if it slows them down during service. Design your routine so that recording takes only a few seconds. Use pre-printed item lists, checkboxes, or drop-down menus wherever possible, and keep the number of fields staff must complete to the essentials. Do not ask line cooks to calculate costs or fill in notes in the middle of a rush. For waste generated during peak service, allow a quick tally during the rush, such as a simple mark on the sheet for each dropped or remade dish, and let the person fill in the details during a quieter moment. A system that bends to the realities of a working kitchen will be followed far more reliably than one that demands perfection. Make Logging Part of the Closing Routine Tie waste tracking to existing habits so it does not depend on memory. Add it to your opening and closing checklists, and make the final review of the sheet part of the end-of-shift handoff. At closing, the shift lead can check that all stations have recorded their discards, flag any obvious gaps, and note unusual events, such as a walk-in cooler failure or an event cancellation, that explain unusually high waste. Hold a brief weekly check-in as well, even five to ten minutes at a pre-shift meeting, to share results, answer questions, and remind the team why the sheet matters. Regular attention signals that the data is being used, which encourages continued participation. Review and Submit Logs on a Schedule Establish a consistent routine for collecting and reviewing the sheets. For paper logs, this might mean gathering them at the end of each day and giving them to the manager. For spreadsheets, it could mean a quick daily scan of new entries. Either way, someone should look at the data regularly, check for missing or unusual entries, and correct mistakes while the details are still fresh. A weekly summary is a good minimum. Totals by category, reason, and station can be compiled in a few minutes and give the team something concrete to react to. Waiting until the end of the month to look at the numbers makes it harder to connect them to specific events and easier for the habit to fade. Keep the Tone Constructive How you talk about the sheet shapes how staff use it. If entries lead to blame or discipline, people will under-report, round down, or quietly throw items away without logging them, and your data will lose its value. Treat the log as a tool for improving systems, not for catching mistakes. Recognize accurate and consistent logging, share wins when waste numbers drop, and ask for staff input on how to fix recurring problems. When cooks see that their entries lead to useful changes, such as better prep lists or smarter ordering, they are far more likely to take the process seriously.
Analyzing the Data to Identify Waste Patterns
Once your team has logged waste for a few weeks, you will have a body of data that can reveal where food and money are being lost. The analysis does not need to be complicated. A few simple reviews, done on a regular schedule, will show you far more than you could ever see by observation alone. Start With Weekly and Monthly Totals Begin by adding up your total waste in both weight and dollar value for each week, then for each month. Weekly totals help you catch problems quickly and connect them to specific events, such as a large catering order or a delivery that arrived late. Monthly totals smooth out day-to-day fluctuations and give you a more reliable baseline to measure against. Your first few weeks of data establish that baseline. Do not be alarmed if the numbers look high at the start. Many kitchens discover they waste more than expected simply because they had never measured it before. The baseline is not a verdict but a starting point. Break the Data Down by Category, Reason, and Station Totals tell you how much you are wasting. Breakdowns tell you why. Sort your data in several ways - 1. By reason code - Which cause accounts for the largest share of waste, such as spoilage, overproduction, or prep errors? 2. By food category - Are you losing more produce, dairy, protein, or prepared items? 3. By station - Which areas of the kitchen generate the most waste? 4. By shift or day of the week - Does waste spike at certain times, such as after slow Mondays or at the end of weekend service? In a spreadsheet, pivot tables or filters make this quick. On paper, a simple tally sheet compiled weekly can serve the same purpose. Identify Your Top Wasted Items Rank your discarded items by both weight and cost, since the two lists can look very different. A large quantity of an inexpensive item, such as lettuce trim, may matter less financially than a small quantity of a costly one, such as seafood or specialty cheese. Many kitchens find that a small number of items account for a large share of their waste. Focusing on the top five or ten items usually produces the biggest improvement for the least effort. Look for Patterns and Recurring Causes Scan the data for repetition. An item that appears on the log every week for the same reason is a pattern worth investigating. Ask questions such as - - Does the same item get thrown out as spoilage every Thursday, suggesting an over-order earlier in the week? - Are certain prep tasks consistently producing more trim than expected? - Does one station log noticeably more cooking errors than others, hinting at training or equipment issues? - Do slow shifts show high overproduction because prep lists are set for busy-night volumes? Patterns point to systems that can be adjusted, while one-off incidents are usually just part of running a kitchen. Connect Waste Data to Menu, Purchasing, and Prep Waste data becomes far more powerful when you compare it with other information you already have. Cross-check it against your sales reports to see whether heavily wasted items correspond to dishes that do not sell well. Compare it with purchasing records to find ingredients you consistently over-order. Review it against your prep lists and par levels to see whether you are preparing more than the volume of business justifies. This is also an opportunity to examine your menu - an ingredient that appears in only one slow-moving dish and is frequently discarded may not be worth keeping in stock. Calculate Waste as a Percentage of Food Cost To judge whether your waste is a serious problem, express it as a percentage of your total food purchases or food cost for the same period. The calculation is straightforward - Waste cost / total food cost x 100 = waste percentage For example, if you discarded $1,200 worth of food in a month and your total food cost for that month was $24,000, your waste percentage would be 5 percent. Tracking this figure over time gives you a single, easy-to-understand number for measuring progress and for sharing results with your team. Because it is a percentage, it also stays meaningful as sales volume rises and falls, which makes comparisons between months more reliable than raw totals.